Wednesday, March 31, 2010

Pork Tenderloin Baked in a Salt Crust - March Recipes to Rival


Browned Roast Set on a Bed of Salt


Roast Buried in Salt


Tenderloin After Roasting and Removal of Salt Crust


Plated Pork Tenderloin


From the kitchen of One Perfect Bite...It's time for the March challenge at Recipes to Rival. This month's challenge, chosen by Temperama of High on the Hog, was roasting a whole fish in a salt crust. She gave us the option of using another protein for the exercise and that's what I decided to do. Bob and I had our first sampling of salt crusted meat in China. Once home, I learned how to roast a whole salt crusted chicken that was a reasonable facsimile of what we had eaten in Asia. I first thought I'd use that for this month's challenge but there were a couple of drawbacks. It was neither quick nor easy to do and Bob pointed out that it had absolutely no color and was singularly unattractive. He also reminded me of the burns I received from the hot salt. I remembered a recipe that I'd seen and clipped for a pork tenderloin that was roasted in a salt crust, but, of course, couldn't find it. Google to the rescue. I found another recipe in an article written by Ezra Klein for The American Prospect and decided to use it for the challenge. The recipe originally appeared in the L.A. Times. The procedure is quite simple and, if you're the least bit adventurous, I urge you to give it a try. While I think the merits of salt crusted roasting are overrated, that doesn't mean it shouldn't be tried. So, if you have time and an obscene amount of salt, I urge you to expand your cooking repertoire. You won't hate the finished product. There are basically three ways to salt roast. Loose salt is most often used with vegetables and shellfish. Shellfish are buried in already hot salt, while vegetables will have salt poured over them. Another method combines salt with water to produce a mixture that looks like wet sand. The "sand" is packed by handfuls over whatever is being roasted. Salt can also be mixed with egg whites before roasting. Some think the egg whites make the "whatever" roast less salty. Interestingly, none of these methods produce something that is unbearably salty, but you'll have to be the final judge of that. Here's the recipe for salt crusted pork tenderloin. Enjoy!

Pork Tenderloin Baked in a Salt Crust...from the kitchen of One Perfect Bite, courtesy of Ezra Klein and the L.A. Times

Ingredients:

2 tablespoons snipped rosemary leaves
6 cups coarse salt
3 tablespoons vegetable oil
1 (1 1/4 -pound) pork tenderloin
1 pound fingerling potatoes, scrubbed but unpeeled
1 tablespoon butter, at room temperature
1 teaspoon minced shallots

Directions:

1) Heat oven to 400 degrees. Combine rosemary and salt in a large mixing bowl and stir in 1 cup of water. Mix until texture is like gritty snow or sand.
2) In a large skillet, heat oil until it shimmers. Pat pork tenderloin dry with paper towels and sear it in hot oil until it is browned on all sides, about 8 minutes.
3) While pork is browning, spoon a layer of salt about one-fourth-inch thick in bottom of a gratin or baking dish just big enough to hold pork and potatoes in a single layer.
4) When pork is browned, pat it dry with a paper towel to remove any excess oil and place it in center of gratin dish. Arrange potatoes around the outside and cover everything with remaining salt.
5) Roast until pork reaches an internal temperature of 145 degrees, about 20 to 25 minutes. At this point, pork will be quite moist but still a little pink. If you prefer pork to be more cooked, push temperature to 150, about 5 more minutes. Remove baking dish from the oven and let set 5 minutes to finish cooking.
6) With a sturdy metal spoon or chef's knife, chip a crack around base of salt crust and carefully lift off top. Use a dry pastry brush to brush away any salt on surface of potatoes or pork, turning pork over to brush all sides. Transfer pork to a carving board. Slice pork into medallions one-fourth-inch thick and arrange on a serving platter. Place potatoes in a medium bowl and toss with the shallots and butter just until coated, discarding any excess butter. Arrange potatoes around outside of pork and serve immediately. Yield: 3 to 4 servings.

You might also enjoy these recipes:

Tuscan Herb Roasted Chicken - One Perfect Bite
Chipotle Marinated Pork Tenderloin - One Perfect Bite
Roast Pork with Raspberry Balsamic Glaze - One Perfect Bite

Tuesday, March 30, 2010

Spring Vegetable Ragout


From the kitchen of One Perfect Bite...Despite a forecast of bad weather, we're heading to the coast for the holiday. Bob and I both love the sea and, strange as it might seem, we love it most when it's raging and buried in drifts of fog. This has the makings of our kind of weekend. Pounding waves and screeching gulls will be music to our ears. While we'll do some eating out, provisions for Easter dinner will come with us. The traveling larder will include gravlaxs, double-cut lamb chops and the fixing for soy glazed potatoes and this lovely vegetable ragout. Dessert will probably be a simple lemon pudding with apricot sauce. The ragout comes from Alice Waters, who does simple better than the legions who try to imitate her. I absolutely love this recipe and the bright shot of green it puts on any table. Three basic ingredients are quickly cooked in what becomes a light butter sauce. If not overcooked the ragout would be fit for Lucullus. The downside of this is the amount of chopping required to bring the dish to the table. That is the only downside. The beautiful ragout, especially if made with the very freshest of vegetables, will bring Spring to your table. Here's the recipe.

Spring Vegetable Ragout...from the kitchen of One Perfect Bite, courtesy Of Alice Waters

Ingredients:
3/4 pounds fresh green peas (See Cook's Note)
3/4 pound asparagus
3 spring onions (about 3/4 cup sliced)
3 tablespoons butter, divided use
1/2 cup water
1 tablespoon chopped parsley or chervil
Salt and pepper to taste

Directions:

1) Shell fresh peas or thaw 1 cup frozen petite peas under cold running water. Set aside. Snap tough ends from asparagus. Discard. Slice stalks into diagonal slices 1/4-inch thick. Cut tips into 1-1/2-inch pieces. Set aside. Trim and thinly slice spring onions.
2) Melt 2 tablespoons butter in a large heavy bottomed skillet. Add onions and cook over medium heat until soft, about 4 to 5 minutes. Add asparagus and peas; stir to combine. Add water and cook until vegetables are just tender, about 4 to 5 minutes. Add reserved 1 tablespoon butter and parsley or chervil. Add salt and pepper to taste. Serve hot. Yield: 4 servings.

Cook's Note: If fresh peas are not available, substitute 1 cup best quality thawed frozen peas.

You might also enjoy these recipes:

Moroccan Carrots - One Perfect Bite
Sugar Snap Peas with Sesame - One Perfect Bite
Green Beans with Sesame Miso Sauce - One Perfect Bite

Tee nyah kuih

 This 'kuih' is typically 'hokkien' and it is time that i talk about my heritage as hokkien 'lang' after being branded as a 'macau sai' by my paternal grandmother cos me and my siblings do not speak our 'mother tongue' that well or rather not at all. We spoke our Mother's tongue, cantonese, but it should not be our Mother's tongue but my Grandma's - Ah Po, who is cantonese. There was once when i was asked by my Ah Ma to tell this hokkien guy who came to look for my Ah Kong - 'ie kee liao pee la lui lee eh au pit'  - hokkien guy seemed to understand what i said, while i myself took a long time to figure out what i said.  Can any of my 'hokkian lang' readers tell me what i said?. 

This kuih is a speciality and will appear on the table of hokkien families during hokkien festivals.  My one and only Ah Koh, made the best tee nyah kuih and i would like my Ah Ma and Ah Koh to be proud of me by making this kuih although mine is not as good.


Ingredients:

1 lb rice flour
2 tbsps tapioca flour
1/2 tsp borax/ pang sar (optional)
2 tbsps potassium carbonate & sodium bi-carbonate solution
2000 ml/2 liters water
1 ½ tbsps cooking oil
1 tsp salt


Method:

Combine rice flour, tapioca flour, borax, potassium carbonate & sodium bi-carbonate solution, salt together in a microwave-safe bowl. . Add in the water, a little at a time, to prevent lumps. Give it a good mix before adding cooking oil and stir well and make sure borax is  dissolved.

Cook in the microwave until a very thick consistency, stirring after every intervals.
Pour in a greased 9 inches round steaming tray and spoon the 2 tablespoons of tap water over surface of kuih.

Steam kuih over rapidly boiling water for one hour.  Replenish water if necessary.  To prevent condensation, wrap steamer cover with a large piece of cloth(using a bamboo steamer is the best).

Test for doneness with a wooden skewer(lidi) pierced in the centre,  It should come out clean.

Cool kuih for a couple of hours before slicing.

Serve with Hong Bak or Red Cooked Pork or Tau Yue Bak


Serves

Monday, March 29, 2010

Lemon Cheese Buns


From the kitchen of One Perfect Bite...Some things never change. One of my grandson's called tonight, ".....love you, Oma." I know he does, but an unsolicited call of this sort, at his age, is unusual and I sensed something was up. We chatted for a bit and then the shoe dropped. "Mom and I have to make a Sachertorte for school tomorrow. Do you have a recipe?" Seems he was giving an oral report on Austria and wanted to share a sample of Viennese food with his classmates. Whatever happened to cupcakes? I quickly pointed out that a Sachertorte was not simple to make and tossed out a couple alternatives that were a bit more realistic. He listened politely but he still wanted to make the torte, so I sent him to a trusted site where he could find a recipe. A few minutes later his mother called. "He asked the wrong question, Mom." My girl is no fool. She doesn't do Sachertorte on Monday night. So, we went to conference call and came up with a Viennese-style fudge that, while delicious, was much easier to do. I thought I could share the recipe with you but I was missing the hazelnuts which are the core of the recipe. What I do have is the recipe for a kolache-like cheese bun that my classmates and I might have taken to school for an Easter party or had for Easter breakfast. The buns are quite nice and would be a lovely addition to your breakfast or brunch table. The soft dough is silky and a joy to work with. You can, of course, substitute plum or jelly fillings for the cheese that is called for here. These do not freeze well, but they will keep for 24 hours if well wrapped and refrigerated. Here's the recipe for an old-fashioned Easter treat.

Lemon Cheese Buns
...from the kitchen of One Perfect Bite

Ingredients:

2 packages (1/4 ounce each) active dry yeast
3/4 cup warm milk (110° to 115°)
1/2 cup sugar
1/2 cup butter, softened
1 teaspoon salt
3/4 teaspoon grated lemon peel
3 eggs
4-1/2 to 5 cups all-purpose flour
Filling *
1 package (8 ounces) cream cheese, softened
1/4 cup sugar
1 egg
1/2 teaspoon grated lemon peel

Directions:

1) In a large bowl, dissolve yeast in warm milk. Add sugar, butter, salt, lemon peel, eggs and 2 cups of flour; beat until smooth. Add enough remaining flour to form a soft dough. Turn onto a floured surface; knead until smooth and elastic, about 6-8 minutes.
2) Place in a greased bowl, turning once to grease top. Cover and let rise in a warm place until doubled, about 1 hour.
3) Punch dough down. Divide in half; shape each half into 12 balls. Place 3-inches apart on parchment paper lined baking sheets. Flatten each ball to a 3-inch circle. Cover and let rise in a warm place until doubled, about 30 minutes.
4) Meanwhile, preheat oven to 375 degrees F.
5) In a small bowl, beat all filling ingredients until smooth. Make a depression in center of each roll; add filling. Bake for 8-10 minutes or until golden brown. Remove from pan to cool on a wire rack. Yield: 2 dozen.

You might also enjoy these recipes:

Hot Cross Buns - One Perfect Bite
Shrove Tuesday Buns - One Perfect Bite
Cinnamon Rolls - One Perfect Bite

This post is being linked to:

Wild Yeast - Yeast Spotting

Sunday, March 28, 2010

Crock-Pot Dried Apricot Jam


From the kitchen of One Perfect Bite...I have a huge store of dried apricots in the pantry. I used a dehydrator for the first time last summer and my over zealous experimentation led to storing far more of the fruit than I could sensibly use. To make matters worse, I forgot the fruit was stored and didn't find it until I began to clean the pantry today. The apricots still retained their color, so I decided to use them to make some jam and a glaze for tarts that I'll be baking later in the week. I have a crock-pot recipe that uses dried apricots to make jam. The recipe is really easy and the only trick is cooking the jam to the consistency you want. No pectin is used in this recipe because apricots are high pectin fruits and the jam will "set" of its own accord if you cook it long enough. If the jam will be kept in your pantry, make sure you sterilize the jars and caps you plan to use for storage. I actually prefer frozen jams, so I bypass that step and make quick work of the very few steps needed to make these beautiful preserves. The frozen preserves retain a lovely amber glow that is muddied in the sterilization process. I can't over emphasize how important it is to cut or shred the fruit into small pieces. Whole apricots are neither attractive or spreadable. They are actually too large to be used to make either jam or preserves. For those who may not know the distinction between jellies, jams and preserves, I have a super short primer. A jelly is made from fruit juice and has no trace of fruit in it. Jam is made by boiling bits of fruit and preserves are basically the same as jam except chunks of fruit are used. The fresh jam will keep in the refrigetor for up to a month and it can be safely frozen for up to a year. If you wish, small amounts or herbs or spices can be added to the completed jam. Here's the base recipe.

Crock-Pot Apricot Jam...from the kitchen of One Perfect Bite

Ingredients:
1-1/4 pound dried apricots
2 cups sugar
3-1/2 cups water
2 tablespoons lemon juice
1/2 teaspoon salt

Directions:
1) Chop apricots finely using a knife or food processor. Place in a 3-1/2 quart crockpot with sugar and water and stir to combine. Cover slow cooker and cook on high for 2-1/2 hours, stirring twice during cooking. Uncover and add lemon juice and salt> Cover again and cook on high 2 hours, stirring occasionally, until thickened.
2) Ladle preserves into clean, hot jam jars, seal tightly, and keep refrigerated up to 1 month. You can process the jars in a boiling water bath if desired, but follow instructions from your county extension agent carefully. The jam can also be frozen, Yield: 4 to 6 pint jars.

You might also enjoy these recipes:

Pumpkin Butter - One Perfect Bite
Tomato Jam - One Perfect Bite
Popovers and Strawberry Butter - One Perfect Bite


This recipe is also being linked to:

Crock Pot Wednesday - Dining with Debbie

Gingery Chilli Sauce

How can anyone eat Hainanese Chicken Rice without the Gingery Chilli Sauce?!! You are missing one of the essences of eating Chicken Rice.  The most important part of a successful and delicious chicken rice meal, is not on the chicken or the rice, but the chili sauce. The chili sauce has a fresh taste of ginger, chili, garlic and calamansi juice  which gives a flavorful “kick”to the meal.  I am very particular about the ingredients used - ginger : it has to be young ginger, ginger which are like my age will not do.  Chillies have to be fresh red and a few fresh  red Chilly padi.  Calamansi juice is a must but sometimes, like the hokkien saying goes - Boh hu hae pun ho - if fish is not available, shrimp will do, then lime juice will be ok.  The proportion of ingredients do not have to be specific - if you like it more gingery, use more ginger and likewise.


Ingredients:

Fresh red chillies
Fresh red chilly padi
Young ginger
Garlic
Calamansi juice/lime juice
Salt and sugar to taste

Method:

Seed the fresh red chillies.

Remove the skin off the young ginger and garlic.

Put all the ingredients except the calamansi/lime juice, in the food processor and process until it becomes a paste.

Remove into a microwave-safe bowl and microwave on high for 1 minute.

Add in salt and sugar and let it cool, then add in calamansi/lime juice.

Pour into a sterilized jar/bottle and keep in the fridge.

Before serving, a little rendered chicken fat and sesame oil can be added.

Serves

Saturday, March 27, 2010

Yucatan-Style Chicken, Lime, and Orzo Soup


From the kitchen of One Perfect Bite..."Come tip toe through the tulips with me." Really. I'm serious. We spent the day at a tulip fest held by a grower in our area and we had a really fantastic time wandering through 3000 acres of gorgeous, glowing color. We left early and returned late, so dinner, while necessary, was problematic. The cast iron stomachs of youth are just that and after a day of corn dogs, currywurst, and elephant ears, our digestive systems need some pampering to neutralize the grease and sugar we managed to consume while making merry. I'm like Mrs. Pac Man at these events. I have to taste everything that's being sold. I am not fond of corn dogs, but they smell so good my olfactory senses convince my brain that the culinary equivalent of a miracle has occurred and this time the corn dog will be delicious. Of course they never are and they are just the beginning of the problem. Smell those curly fries? I'm there in seconds. Blue cotton candy? I'm weak in the knees. Bob jokes, I hope, that it's less expensive to take me to the opera than a fair. After a day of such excess something light and palate cleansing is in order and this soup is perfect on both those counts. It's a quick fix meal that is perfect for a light spring supper. I found the recipe years ago in a copy of Bon Appetit magazine. They say the soup comes from the Yucatan. That may be, but I suspect it came from a resort rather than a native kitchen. Regardless, it is a lovely soup. I hope you'll try the recipe.

Yucatan-Style Chicken, Lime and Orzo Soup ...from the kitchen of One Perfect Bite, courtesy of Bon Appetit magazine

Ingredients:

3/4 cup orzo (rice-shaped pasta)
1 1/2 tablespoons olive oil
1 medium white onion, thinly sliced
6 garlic cloves, thinly sliced
2 jalapeño chiles, thinly sliced
3/4 pound skinless boneless chicken breasts, cut into matchstick-size strips
5 cups low-salt chicken broth
1/4 cup fresh lime juice
1 large tomato, seeded, chopped
1/4 cup chopped fresh cilantro
Fresh cilantro sprigs

Directions:
1) Cook orzo in pot of boiling salted water until just tender. Drain well.
2) Heat oil in large saucepan over medium heat. Add onion, garlic, and chiles. Sauté until onion begins to brown, about 4 minutes. Add chicken; sauté 1 minute. Add broth, lime juice, and tomato. Simmer until chicken is cooked through, about 3 minutes. Mix in orzo, then chopped cilantro. Season soup with salt and pepper. Ladle soup into 4 bowls. Garnish with cilantro sprigs. Yield: 4 servings.

You might also enjoy these recipes:
Avgolemono - One Perfect Bite
Tortilla Soup - One Perfect Bite
Chicken Long Rice - One Perfect Bite

Friday, March 26, 2010

Limoncello - Pink Saturday


From the kitchen of One Perfect Bite...I make Limoncello as a gift for friends. Lemons, bought in quantity, are relatively inexpensive throughout the year, so I'm not seasonally tied to its preparation. I have several recipes for the liqueur, but I usually end up using one developed by Giada De Laurentis because it is simple to make and is ready to drink in days rather than months. While many drink Limoncello out of hand, I prefer to dilute it and serve it over ice. Its main purpose in our house is to use as an ingredient in cheesecake and other lemon desserts. I am "brewing" a bottle now to use in a cheesecake that I plan to make for the Easter holiday. If you like Limoncello you know the only thing that can spoil it is too much sugar. I've cut back on the amount of sugar that was called for in the original recipe. I also use 100 proof vodka. Anything less than that will freeze and you don't want that to happen. Here's the recipe that I use to make homemade Limoncello. You might want to consider it as an aperitif for Passover or Easter.

Limoncello...from the kitchen of One Perfect Bite, inspired by Giada De Laurentis and others

Ingredients:
10 large lemons
1 (750-ml) bottle 100 proof vodka
3-1/2 cups water
2 cups sugar

Directions:

1) Using a vegetable peeler, remove peel from lemons in long strips (reserve lemons for another use). Using a small sharp knife, trim white pith away from lemon peels; discard pith. Place lemon peels in a 2-quart pitcher. Pour vodka over peels and cover with plastic wrap. Steep for 4 days at room temperature.
2) Stir water and sugar in a large saucepan over medium heat until the sugar dissolves, about 5 minutes. Cool completely. Pour sugar syrup over vodka mixture. Cover and let stand at room temperature overnight. Strain limoncello through a mesh strainer. Discard peels. Transfer limoncello to bottles. Seal the bottles and refrigerate until cold, at least 4 hours and up to 1 month. Yield: 7 cups.

You might also enjoy these recipes:

Blue Lemonade - One Perfect Bite
Homemade Irish Cream Liqueur - One Perfect Bite
Cranberry Cocktails - One Perfect Bite


This post is being linked to:
Pink Saturday, sponsored by Beverly at How Sweet the Sound.

Nasi Biryani

I have cooked nasi biryani many times and somehow, this chinese lady is not getting it right.  My nasi biryani did not have the indian or malay umph and more often than not, the rice was not totally cooked through according the method provided in most recipes, and i have to resolve by using the microwave to finish the cooking.  But, nowadays, cooking nasi biryani is no more a problem, thanks to Vivien Tan, one of my readers who have become a dear friend, send me a few packets of 'SHAN"  brand for  biryani .  I followed the instructions on the back of the packet and my biryani rice have always been cooked through and the nasi was spicy, with all the umphs.  I find the taste to be slightly too salty so i reduced the amount of salt recommended to 1 tablespoon, when i was cooking the rice.  Thank you Vivien for sending me the Shan premixed, they are available now here in our indian stores.


Ingredients:

1 1/2 lbs chicken pieces
1 1/3 lb basmati rice - soaked for 30 minutes and drained
1 tbsp tamarind pulp - soaked in 1 cup water for 30 minutes, Then press and sieve the juice.
2 - 3 medium onion - sliced(about 1/2 lb)
2 tbsp grated ginger
2 tbsp chopped garlic
1 cup cooking oil
1 packet 'Shan' Malay Chicken Biryani
Rasins
Fried shallots
Toasted cashew nuts
Cilantro for garnishing

Method:


Marinate chicken pieces with ginger, garlic and 2 tbsp of Shan Malay Chicken Biryani mix for 1 hour.

Heat oil and brown the marinated chicken pieces. Remove and set aside.

Sweat the chopped onions, then add in browned chicken pieces,  the rest of the Shan Malay Chicken Biryani mix, tamarind juice and 1 cup water.  Continue to cook and stir until sauce is thickened. Set aside.

Boil 10 cups of water with 1 tbsp salt and add in the soaked rice.  Boil until the rice is three-quarter tender.  Drain the liquid.

Assembling the Biryani:

Spread the cooked chicken pieces and the drained rice in layers into the rice cooker.

Top with raisins, then cover and press the cook function and cook until rice is cooked through.

Slightly mix the rice and chicken pieces and garnish with cashew nuts and fried shallots before serving.


Serves

Pasta Primavera


From the kitchen of One Perfect Bite...I love pasta, so when I came across a dish that is heart healthy, diet friendly and delicious I knew it had to be shared. Several years ago Giada De Laurentis featured this version of Pasta Primavera on her television show. At the time it was unique because it was made with roasted vegetables and used pan juices rather than cream to coat the pasta. While this is not a difficult dish to make, it involves mise en place a plenty and it's best to set aside 30 minutes to prepare the vegetables for the oven. Try to cut them all into matchstick-size pieces to insure even cooking. You will need two large baking sheets to hold the vegetables and it will look like you are planning to feed the immediate world. Don't worry, their volume will decrease by half as they cook, so you'll be left with a manageable quantity to add to the pasta. I do cheat a little when I make this dish. I've found that the other vegetables cook more quickly than the carrots, so I blanch the carrots prior to roasting. I also warm the tomatoes before adding them to the pasta. This recipe makes a lot of food. If you are cooking for a small family I'd advise cutting the recipe ingredients in half. The dish does not freeze well. If you are looking for a meatless meal, I think you'll love this one. Here's the recipe.

Pasta Primavera
...from the kitchen of One Perfect Bite, courtesy of Giada De Laurentis

Ingredients:
3 carrots, peeled and cut into thin strips
2 medium zucchini or 1 large zucchini, cut into thin strips
2 yellow squash, cut into thin strips
1 onion, thinly sliced
1 yellow bell pepper, cut into thin strips
1 red bell pepper, cut into thin strips
1/4 cup olive oil
Kosher salt and freshly ground black pepper
1 tablespoon dried Italian herbs or herbes de Provence
1 pound farfalle (bowtie pasta)
15 cherry tomatoes, halved
1/2 cup grated Parmesan

Directions:

1) Preheat the oven to 450 degrees F.
2) On a large heavy baking sheet, toss all vegetables, except for tomatoes, with oil, salt, pepper, and dried herbs. Coat well. Transfer half to another heavy large baking sheet and arrange vegetables evenly on pans. Bake until carrots are tender and vegetables begin to brown, stirring after first 10 minutes, about 20 minutes total.
3) Meanwhile, cook pasta in a large pot of boiling salted water until al dente, tender but still firm to the bite, about 8 minutes. Drain, reserving 1 cup of cooking liquid.
4) Toss pasta with vegetable mixture in a large bowl to combine. Add cherry tomatoes and enough reserved cooking liquid to moisten. Season with salt and pepper, to taste. Sprinkle with Parmesan and serve immediately. Yield: 6 Servings.

You might also enjou these recipes:

Pasta Puttanesca - One Perfect Bite

Straw and Hay - One Perfect Bite
Capellini Capricciosi - One Perfect Bite

Thursday, March 25, 2010

Biscotti

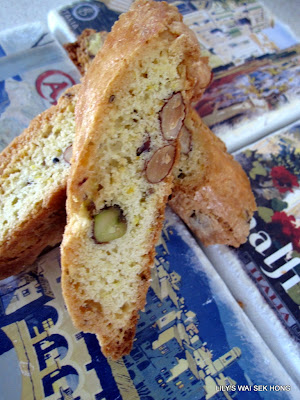
This recipe is from Jacques Torres's book - Dessert Circus.  According to Jacques Torres, biscotti is traditionally an italian cookie which is baked two times to produce a hard cookie that they like to dip in sweet wine.  He has adapted the recipe so these cookies are not quite so hard and also cut the baking time in half.  He used cold butter so he can roll and bake them right away.  These fragrant, flavorful cookes are great by themselves or dunked in coffee and since Jacques Torres is from Provence, he prefers to dip his in 'pastis'.  Me, having lived in Malaysia,  will have mine with 'Kopi-O'.


Ingredients:

3/4 cup/4 ozs/100 gm whole unblanched almonds
1/3 cup/1.6 ozs/50 gm whole pistachios
7 tbsp/3.5 ozs/100 gm Cold unsalted butter, cubed
3/4 cup/5.25 ozs/150 gm granulated sugar
2 cups/8.8 ozs/250 gm all purpose flour
1 tbsp/0.3 oz/8 gm Anise seeds
1 tsp/0.2 oz/6 gm baking powder
Grated zest of 1 lemon
Pinch of salt
2 large eggs

For the egg wash

1 large egg white, beaten

Method:

Preheat the oven to 300 f(150 c). 

Spread the almonds and postachios evenly on a bking sheet and place in the oven,

Toast for about 30 minutes, until they are golden brown.

You will be able to smell the n uts when they are ready.

A good test is to break a nut in half and check to see if it is light brown on the inside.

Toasting the nuts brings out their natural flavor.

Remove them from the oven and allow to cool completely on the baking sheet on wire rack.
Place the remaining ingredients in a large mixing bowl and beat with an electric mixere on medium speed until well combined, abvout 5 minutes, the mixture will hold together in a soft dough.

Add the colled toasted nuts and mix until they are evenly incorporated, about 1 minute.  If you are using hand-held mixer, you may want to knead in the nuts by hand to avoid buring out the motor of the mixeer.

Remove the dough from the mixing bowl and place on a very lightly floured work surface.  If the dough is stickly and hard to work with, it is too soft.  To fix this. flatten it into a disk, cover with plastic wrap, and place it in the refrigerator for  a minumum of 1 hour.(When the butter in the dough gets cold, the dough will stiffin).  Remove from the regrigerator and proceed.

Preheat the oven to 350 f(175c).

Divide the dough into three equal pieces.  Use the palms of your hands to roll each piece on the lightly floured work surface into a rope 1 - 1 1/2 inches in diameter.  Each rope should be even and fit on your bking sheet lengthwise.  If the dough sticks to your hands or to the work surface as you are rolling it, dust it lightly with flour.

Roll firmly to remove any trapped air bubbles (At this stage, you can wrap the dough well in plastic wrap and freeze for up to two weeks.  Bring it back to room temperature before baking.)

Place two of the piscotti ropes on a parchment paper-covered baking sheet.  You will only have room for two because they spread as they bake.  With a pastry brush, lightly brush each rope with the egg white; this will add shine to the4 baked biscotti.

Bake until golden brown, about 30 minutes. 

Remove from the oven and let cool slightly on the baking sheet.

Use a serrated knife to slice the biscotti on a diagonal into 1/2 inch thick cookies.  If you do this while the biscotti are still warm, they not crumble.  The biscotti will harden as they cool.  If they are still soft when you slice them, place the slices on a bking sheet and bake at 300f(150c) for another 10 - 15 minutes.  Repeat the baking and cooling procedure with the remaining biscotti rope.

Store in an airtight container at room temperature for two or three weeks.

Variation: 

Dip the biscotti halfway on a diagonal into tempered bittersweet chocolate.  Wipe the excess chocolate from the tip and place the bniscotti on a sheet or parchment paper to allow the chocolate to set.

Serves

Wednesday, March 24, 2010

Shrimp Enchiladas Verde

Photobucket

Photobucket

From the kitchen of One Perfect Bite...I'm always on the lookout for meatless meals, especially at this time of year. I came across a recipe for shrimp enchiladas in Family Circle magazine last week. I had homemade salsa and really fresh shrimp in the refrigerator, so there was no reason not to give the recipe a try. It was easy to do and I was really happy with the results. I followed the original recipe to a tee, but I wanted to try it again using frozen shrimp and bottled salsa before I shared it with you. I wanted to make sure that the quality of the the ingredients I had originally used hadn't skewed the results. I made the dish again tonight and can report that the enchiladas are a really nice weekday meal. I don't think they'll ever become anybody last meal request, but you'll be pleased with the results. The enchiladas can be on the table in less than an hour, and most of that hour is cook time. Here's the recipe for shrimp enchiladas with salsa verde.

Shrimp Enchiladas Verde...from the kitchen of One Perfect Bite, Coutesy of Family Circle Magazine

Ingredients:
2 tablespoons olive oil
1/2 medium-size red onion, peeled and thinly sliced
1/2 medium-size green bell pepper, seeded and thinly sliced
1-1/4 pounds medium shrimp, shelled, deveined and cut in half crossways
1 cup frozen corn, thawed
1 teaspoon chili powder
1/2 teaspoon ground cumin
8 corn tortillas
1 bottle (16 ounces) tomatillo salsa (such as La Victoria)
3 tablespoons half-and-half
1 cup shredded reduced-fat Monterey Jack cheese

Directions:
1) Heat oil in a large nonstick skillet over medium-high heat. Add onion and pepper; cook 3 minutes, stirring occasionally. Add shrimp; cook an additional 3 minutes, until shrimp is opaque. Stir in corn, 1/4 cup water, chili powder and cumin. Heat through.
2) Heat oven to 375 degrees F. Coat a 11 x 8 x 2-inch baking dish with nonstick cooking spray.
3) Wrap four tortillas in damp paper towels. Microwave 30 seconds. Brush one side of each tortilla with salsa. Spoon 1/2 cup shrimp mixture on each. Roll up and place seam-side down in prepared dish. Repeat with remaining tortillas and filling. Top with any extra filling.
4) Mix remaining salsa with half-and-half. Spoon over enchiladas. Sprinkle with cheese. Bake at 375 degrees F, uncovered, for 15 minutes or until bubbly. Yield: 4 servings.

You might also enjoy these recipes:
Camarones a la Mexicana - One Perfect Bite
Thai Tamarind Shrimp - One Perfect Bite
Shrimp Cakes with Sweet and Sour Tomato Sauce - One Perfect Bite

Easy Cupcake

It's Mother Nature's form of March Madness in Colorado! Heavy snow fell overnight, leaving more than a foot of heavy snow.  I am glad it was not yesterday, cos i had to make and bring these cupcakes to Renee's school, so that her classmates can have them during recess.   A double-dose of lemon extract and lemon juice-- in the cake and in the buttercream frosting -- gives these cupcakes great lemony taste and just the right amount of sweetness -- and they were more than irresistible. 


Ingredients:

2 cups self rising flour or 2 cups bleached all-purpose with 2 tsp baking powder
1 1/4 cup fine granulated sugar
1 teaspoon salt
1/2 cup butter/shortening(very soft but not melted, Crisco is best)
3/4 cup water with 1 tbsp lemon juice(any juice of your choice)
2 large eggs
1/2 tsp lemon extract(pair with the juice of your choice)

Method:

1 Set oven to 350 degrees F.

2 In a large bowl, mix together the flour with sugar and salt until combined.

3 Add in the butter/shortening , beat on medium speed of an electric mixer until all the flour/sugar are coated.

4.Add in eggs and lemon extract to the juice and beat lightly.

5.Add liquid to the dry ingredients and beat until well combined and blended, scraping the bowl constantly. (the batter will be thick, if desired you may add in a few more tablespoons juice).

6. Pour into paper-lined regular size muffin tins filling under just three-quarters full or half full.

7.Bake for 20-22 minutes or until the cupcakes test done (do not overbake as they will be dry).

8.Immediately remove from pans.

9.Cool completely before frosting.

Buttercream:

1/2 cup (1 stick) butter or margarine softened
1/2 tsp lemon extract
2 cups sifted confectioners' sugar (approximately 1/2 lb.)
1  tablespoons milk

Makes: About 1 1/2 cups of icing.


Method:

In large bowl, cream butter/shortening with electric mixer.

Add lemon extract..

Gradually add sifted sugar, one cup at a time, beating well on medium speed. Scrape sides and bottom of bowl often.

When all sugar has been mixed in, icing will appear dry. Add milk and beat at medium speed until light and fluffy.

Keep bowl covered with a damp cloth until ready to use.

For best results, keep icing bowl in refrigerator when not in use.

Refrigerated in an airtight container, this icing can be stored 2 weeks. Rewhip before using.

For thin (spreading) consistency icing, add 1 tablespoons light corn syrup, water or milk.


Serves

Tuesday, March 23, 2010

Asian-Style Carrot Salad


From the kitchen of One Perfect Bite...Most of us have a recipe for the ubiquitous carrot-raisin slaw tucked somewhere in our kitchen files. I haven't used my copy of the salad in over thirty years. I was never especially fond of it and, as we began to travel, I found other recipes that I thought were far more satisfying. This Asian-style carrot salad is one of my current favorites. There is a tartness to it that plays nicely against sweet barbecued meats and it is a wonderful, easy addition to an Asian-style meal. We had a salad that was quite similar to this while we were in Thailand. This salad, developed by Laurent Tourondel for Food and Wine magazine, is zen-like in its simplicity. Its only ingredients are carrots and cilantro. The dressing, however, takes the salad to another plane. Carrot and ginger juice are teamed with vinegar and a mixture of oils to produce a vibrant dressing that is unique and plays nicely with the sweet and crunchy carrots it is used to dress. I do have a few cautions should you choose to make it. If you can't resist the temptation to use pre-shredded carrots, test to make sure you can get a forkful that doesn't resemble porcupine quills into your mouth. That is a lesson learned from bitter and embarrassing experience of the "we grow too soon old and too late smart" variety. You should also know that the dressing will slightly dull the vibrant color of the carrots. The carrot juice can't quite overcome the mayonnaise in the dressing and the carrots will take on a slightly milky hue. Lastly, don't add the final measure of cilantro until you are ready to serve the salad. Its brilliant green is gorgeous against the orange of the carrots, but if it sits too long it will blacken and add nothing to the finished salad. If I haven't scared you away, here's the recipe for a unique salad that I think you'll enjoy.

Asian-Style Carrot Salad
...from the kitchen of One Perfect Bite, courtesy of Laurent Tourondel

Ingredients:

1 pound carrots, peeled and shredded
1 garlic clove, minced
2 tablespoons sherry wine vinegar
1 cup coarsely chopped cilantro
1/2 cup canola oil
Salt and freshly ground pepper
1/3 cup carrot juice
2 tablespoons mayonnaise
1-1/2 teaspoons Asian sesame oil
3/4 teaspoon fresh ginger juice, squeezed from 2 teaspoons finely minced ginger

Directions:
1) Combine carrots, garlic, vinegar, 1/2 cup cilantro and 1/4 cup canola oil in a medium bowl. Toss well. Season to taste with salt and pepper. Let carrots stand for 15 minutes. Drain well.
2) Boil carrot juice in a small saucepan set over medium heat until reduced by half, about 5 minutes. Cool slightly. Add mayonnaise, sesame oil, ginger juice and reserved 1/4 cup canola oil. Season with salt and pepper to taste.
3) Add dressing and remaining 1/2 cup cilantro to carrots and toss well. Transfer to serving bowl. Serve immediately. Yield: 6 servings.

You might also enjoy these recipes:

Asian Bean Sprout Salad - One Perfect Bite

Thai Cucumber Salad - One Perfect Bite
Khmer Green Papaya Salad - One Perfect Bite

Horner's Corner Plum Bread


From the kitchen of One Perfect Bite...Oven duty began early this morning. There's been a death in a neighbor's family and I wanted to get a loaf of their favorite plum bread to them while it was still warm and fragrant. When I make this kind of visit, I'm confounded by the way we mark the measure of a man and his passing. A life, a good life of 80 years, is over and can't be summarized in the seven lines of his obituary. Those who mark his passing will take those lines and, from them, weave the history that is his life and share it with each other. He was not a religious man, so, most likely, this story will be told at the table as they break bread together. Friends and neighbors will assure that none who gather to tell that story will go hungry. Food has become an important part of all our rituals. This bread is but one of many offerings that will be shared as his story is re-told.

Plum Bread
...from the kitchen of One Perfect Bite


Ingredients:
1 cup pitted dried plums, coarsely chopped
3 cups all-purpose flour + flour for kneading
1 cup whole wheat flour
4-1/2 teaspoons active dry yeast
1 teaspoon salt
1 cup mashed sweet potatoes
1 cup warm milk
1/4 cup + 1 tablespoon honey, divided use
1 tablespoon vegetable oil
2 tablespoons fresh orange juice

Directions:

1) Toss plums with 1 tablespoon flour. Set aside. Combine 1-1/2 cups all-purpose flour, whole wheat flour, yeast and salt in bowl of an electric stand mixer. Add sweet potatoes, milk, 1/4 cup honey and oil. Beat with a paddle attachment until smooth, about 2 minutes. Stir in reserved 1-1/2 cups flour and mix to form a soft dough.
2) Turn dough onto a floured surface and knead until smooth and elastic, about 10 minutes. Knead plums into dough. Place dough into a bowl coated with vegetable oil or cooking spray. Turn to coat top. Cover with plastic wrap and let rise in a warm spot until doubled in bulk, about 1 hour.
3) Punch down and turn dough onto a lightly floured surface. Divide into 3 potions. Roll each portion into a rope about 15-inches long. Braid ropes, pinching ends to seal. Place braid on a baking sheet covered with parchment paper. Cover and let rise until double in bulk, about 30 minutes.
4) Meanwhile, preheat oven to 350 degrees F. Bake bread for 40 minutes, or until loaf sounds hollow when tapped. Remove pan from oven and place on a cooling rack. Mix reserved 1 tablespoon honey with orange juice and brush over exposed surfaces of bread. Yield: 1 large loaf.

You might also enjoy these recipes:

Lemon and Blueberry Sweet Bread - One Perfect Bite
Lemon Poppyseed Bread - One Perfect Bite
(Almost) Irish Soda Bread - One Perfect Bite

This post is being linked to:

Wild Yeast - Yeast Spotting

Renee's 8th Birthday Cake

Today is Renee's 8th Birthday and i am still busy although her birthday party for her friends was on Saturday last weekend, i have to make cupcakes for her class, now and the sooner i get this posting done, the faster i can get started with the cupcakes.  There were so much prep for her Birthday Cake, her theme was Art and Craft and she wanted so many impossibles which i am not capable of.  I had just wanted to make the figure 8 and put in sweet girly things.  In the end, we compromised, i had my figure 8 and she had her paint palate, with paint brushes, paints etc.  HAPPY BIRTHDAY RENEE.


Ingredients:

2 x 8 inch cake of choice
Buttercream
Modelling paste - 1/3 cup water
                            2 tsp powdered gelatin
                            3 tsp glucose/corn syrup
                             4 cups confectioner's sugar
 -

Method:

Put water into a small saucepan, sprinkle the gelatine on to the water.

Heat gently until the gelatine dissolves, do not allow to boil. 

Remove from heat, stir in the glucose /corn syrup and allow to cool.

Place confectioner's sugar into a bowl.  Gradually pour in the liquid, mixing till the paste forms a plastercine-like consistency.

Turn out onto a a clean board dusted with a little cornstarch and knead till smooth.
To make different colours, divide the dough and tint each piece with food coloring, kneading well with the colours you wish to use.


Serves