


Showing posts with label cookie. Show all posts

Friday, November 19, 2010

Nānkhatāi - Diwali - Pink Saturday


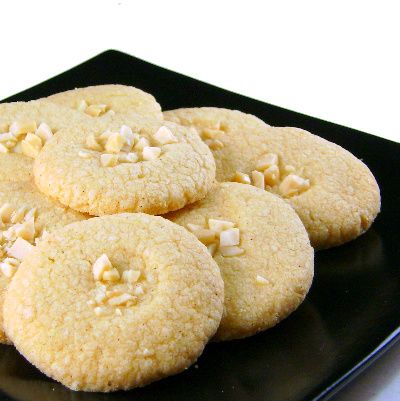
From the kitchen of One Perfect Bite...All of today's pictures are linked to Diwali, the Hindu holiday that celebrates the return of Lakshmi, the goddess of prosperity. The holiday is much like our Christmas with odd bits of Independence Day and Halloween thrown in. Please understand, I mean no disrespect. Lanterns are lit, families gather and gifts are exchanged during this joyous celebration of light. Firecrackers are used to frighten away evil spirits that might threaten the return of the goddess and children go door to door seeking a reward for the entertainment they provide. The cookie, called a Nānkhatāi, is an eggless shortbread that has a sandy texture. It is sold during the holiday by street vendors who specialize in sweetmeats and other treats. The pigeon is another story. The bird is not a mutant. He is one of many that have been tinted for Diwali. Why? I'm clueless and have been unable to find anyone who can give me a sensible answer. The design being created on the street outside the fence is called a rangoli and it's meant to welcome visiting deities. It, and thousands like it in other Hindu homes, will be lit at night with myriad small lanterns that will give streets the appearance of being swarmed by fireflies or glow worms. It is quite a sight. While I was able to sample most of the foods associated with Diwali, I missed these cookies and wanted to try them once I returned home. I made them today and I must say I'm not thrilled with the results. The cookie is fine, but, with so much good shortbread around, it merits only a lukewarm review. I decided to post it with reservations because it is a Indian dessert and I wanted to conclude my tour of India with something sweet. I'll let you be the judge of its merits. Here's the recipe.

Nānkhatāis...from the kitchen of One Perfect Bite courtesy of Culinary Annonations

Ingredients:

1/2 cup confectioners’ sugar
1/2 cup refrigerated ghee (clarified butter) or unsalted butter
1/2 teaspoon pure vanilla extract
1/2 cup unbleached all-purpose flour (maida)
1/2 cup semolina flour (rava)
3/4 teaspoon ground cardamom [or 1/4 teaspoon ground nutmeg]
3/4 teaspoon baking powder
2 tablespoons chopped nuts for topping

Directions:
1) Line a cookie sheet with parchment or wax paper. Pre-heat oven to 325 degrees F.
2) Sift confectioners' sugar into a mixing bowl. Add refrigerated ghee/butter and cream mixture until fluffy. Add vanilla and mix to incorporate.
3) Sift flour, semolina and baking powder into another bowl. Whisk in cardomom. Add flour mixture to creamed mixture in two parts. Once a cookie dough forms, transfer it to a cold working surface and knead a few times. Break dough into 20 equal-sized portions and shape into flattened rounds. Make a thumb impression in center of each and press in a few pieces of nuts.
4) Bake cookies for about 20 to 25 minutes. Check at 20 minute interval to ensure that cookies do not brown or develop any deep color. Be aware that these cookies will crack slightly. That is as it should be. Cool on wire racks. Store airtight. Yield: 18 to 20 cookies.

You might also enjoy these recipes:
Semolina and Almond Salwa - eCurry
Gulab Jamun - Phem Fatale
Strawberry Busundi - Food Lyrics
Milk Cake - The Vegetarian Way
Pumpkin Kulfi - Eggless Cooking
Rasmalai - The Inner Gourmet

This post is being linked to:
Pink Saturday, sponsored by Beverly at How Sweet the Sound.

Thursday, October 28, 2010

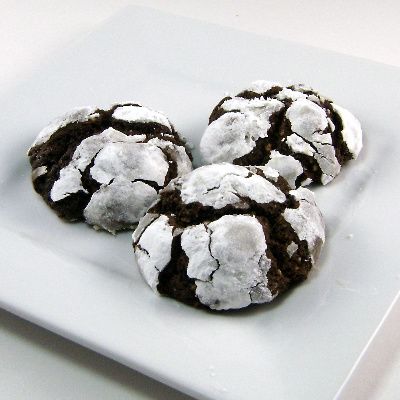
Chocolate Peanut Crinkles


From the kitchen of One Perfect Bite...This cookie recipe kept making the rounds and each time I saw it I became "curiouser and curiouser." Chocolate crinkles, I call them snowballs, are a favorite of mine, so it was only a matter of time before I actually tried the recipe. It was developed by Bill Yosses, a White House pastry chef, and I wanted to see how his cookies differed from the old classic I've grown to love. They are, indeed, different. Their texture is far more cakelike than what I'm familiar with. They are also huge in size. Whether that's good or bad is a subjective call. The nuts add a subtle taste to the finished cookie, but they don't overpower the chocolate, and the bit of added texture they provide is not unpleasant. I'm glad I made these cookies, though I don't plan on making them them again. They are delicious to be sure, but delicious comes on a sliding scale. The classic recipe I use can be found here. I think it makes a better cookie. I don't want to dissuade you from trying Chocolate Peanut Crinkles. Your opinion my differ from mine. Here's the recipe.

Chocolate Peanut Crinkles...from the kitchen of One Perfect Bite, courtesy of Bill Yosses and Melissa Clark

Ingredients:
2/3 cup toasted, skinned unsalted peanuts
2 tablespoons granulated sugar
6 ounces bittersweet chocolate, coarsely chopped
2-3/4 cup all-purpose flour
2 tablespoons Dutch-processed unsweetened cocoa powder
2 teaspoons baking soda
3/4 teaspoon salt
1-1/2 cups light brown sugar
8 tablespoons unsalted butter, softened
2 large eggs, room temperature
1/4 cup whole milk
1 teaspoon pure vanilla extract
3/4 cup confectioners’ sugar

Directions:

1) Place nuts and granulated sugar in bowl of a food processor fitted with a blade attachment. Pulse to finely chop.
2) Melt chocolate in the top of a double boiler set over a pot of simmering water.
3) Sift flour, cocoa powder, baking soda and salt together in a large bowl. Place butter and brown sugar in bowl of an electric mixer fitted with a paddle attachment. Cream until light and fluffy. Add eggs, one at a time, until incorporated. Beat in the melted chocolate, stopping mixer to scrape down sides before beating again. Mix in milk and vanilla. Add flour mixture in three additions, and mix until just combined. Fold in nuts.
4) Form dough into a ball and cover tightly with plastic wrap. Refrigerate dough for 3 hours or overnight.
5) When you are ready to bake, preheat oven to 350°F. Line two baking sheets with parchment paper, or lightly butter them, and set aside.
6) Place confectioners’ sugar in a wide, shallow bowl. Scoop out a heaping tablespoon of dough and roll into a ball. Coat generously with sugar and transfer to a baking sheet, placing them at least 2-inches apart. Repeat with remaining dough and sugar.
7) Bake cookies, turning sheets from back to front and swapping racks halfway through, until cracked but not completely firm, 12-15 minutes. Cool cookies on the sheets for about 2 minutes, then use a spatula to transfer to wire racks to cool further. They may be stored airtight at room temperature for up to 2 days. Yield: 3-1/2 dozen.

You might also enjoy these recipes:
Chocolate Cookies n' Cream Cookies - Baking Bites
Dark and Bitter Orange Chocolate Cookies - The Technicolor Kitchen
Flourless Peanut Chocolate Cookies - Culinary in the Country
Double Chocolate Dream Cookies - Cookie Madness
Chocolate Sables: World Peace Cookies - Deep South Dish
Triple Chocolate Cookies - Une Gamine dans la Cuisine
Totally Chocolate Chocolate Chip Cookies - Sweet and Savory Tooth
Thick and Chewy Triple Chocolate Cookies - Brown Eyed Baker

Thursday, September 23, 2010

White Chocolate Lime Cookies and Other Absurdities


From the kitchen of One Perfect Bite...At the bottom of the hill on which our house is perched, there's a community of townhomes whose name always makes me smile.
I suspect that at some point in my life, my sense of the absurd was overly stimulated and I was left with a heightened appreciation of the ridiculous. I also smile when I see a recipe that calls for white chocolate or I'm served a glass of white sangria. Can sangria or chocolate be white? Sangria, whose name comes from the Spanish word for blood, should be that deep color. White sangria, its counterpart, is colorless, like plasma. We all know that white chocolate, which is nothing more than cocoa butter mixed with milk and sugar, is quite unlike the real thing. They both, however, have benefited from thoughtful naming and good marketing. You'd probably never take a bite of something called cocoa butter cheese cake and would never dream of ordering a glass of you know what. What's in a name? Sometimes quite a lot. I have a handful of recipes that use white chocolate. Most of them combine white chocolate with lime. I love the combination and actively seek it out. I found this recipe for cookies that use both at The Fresh Loaf and at Evil Shenanigans. I've made minor changes to the recipe. After baking the first batch, I doubled the amount of lime juice and zest used to make the cookies. These are really quite nice and I think you'll enjoy them. Here's the recipe.

White Chocolate Lime Cookies...from the kitchen of One Perfect Bite, inspired by Evil Shenanigans

Ingredients:

1 cup unsalted butter, softened
3/4 cup sugar
3/4 cup light brown sugar
2 eggs
1 teaspoon vanilla
Zest of 2 limes
2 teaspoons lime juice
2 1/2 cups all-purpose flour
1 teaspoon baking soda
1/4 teaspoon baking powder
1/4 teaspoon salt
1 (12-oz.) bag white chocolate chips

Directions:
1) Preheat oven to 350 degrees F. Line three cookie sheets with parchment paper.
2) Combine butter and sugar in bowl of an electric stand mixer. Beat until combined but not fluffy. Add eggs, one at a time, beating just to incorporate. Add vanilla, lime juice and zest and mix to combine.
3) Combine flour,baking soda, baking powder and salt in a separate bowl. Whisk to combine and lighten. Mix into creamed mixture just until combined. Fold in white chocolate chips.
4 ) Shape dough into 36 balls. Place them 3-inches apart on cookie sheets. Bake until edges are golden and centers are just set, about 12 to 13 minutes. Let sit in pan for 3 minutes before moving to cooling racks. Yield: 3 dozen cookies.

You might also enjoy these recipes:
Key Lime and White Chocolate Cake Squares - One Perfect Bite
Chunky White Chocolate and Almond Oatmeal Cookies - Gourmeted
Macaron with White Chocolate - My Kitchen Treasures
Sour Cherry, White Chocolate and Almond Scones - The English Kitchen
White Chocolate and Macadamia Nut Blondies - Squirrel Bakes
Caramelized White Chocolate Cake - E L R A
Raspberry White Chocolate Scones - Playing House
Raspberry White Chocolate Cake - Sweet Kat's Kitchen

This post is being linked to the Cookie Exchange at Relatively Unique

Wednesday, February 24, 2010

Crisp Cranberry and Carrot Oatmeal Cookies


From the kitchen of One Perfect Bite...Arguably, there are few snacks more appealing than an old-fashioned oatmeal cookie. While I suspect your favorite recipe for them was selected years ago, I have one more version I'd like you to try. These crisp cookies use less shortening than most and they're so packed with good things that a snake oil salesman might actually be able to convince you that they're good for you. I wouldn't go that far, but if your sweet tooth demands a snack, you could do worse. How's that for a rave review? Seriously, the cookies are packed with oatmeal, carrots, cranberries and nuts and there is hint of orange buried in the dough that gives them a unique flavor. It's hard to make a homely cookie anything more than it is, so rather than try let's get right to the recipe for this not bad for you cookie. Here it is.

Crisp Cranberry and Carrot Oatmeal Cookies...from the kitchen of One Perfect Bite

Ingredients:

1/2 cup butter
1 cup brown sugar
1/2 cup granulated sugar
2 large eggs, beaten
1 teaspoon fresh orange zest
1 tablespoon orange liqueur or concentrated orange juice
1 teaspoon vanilla extract
2 cups all-purpose flour
2 teaspoons baking powder
1/2 teaspoon baking soda
1/2 teaspoon salt
2 cups rolled oats
1 cup dried cranberries
1 cup grated carrots
1 cup chopped toasted walnuts

Directions:
1) Preheat oven to 350 degrees F. Line 2 cookie sheets with parchment paper. Set aside.
2) Cream brown and white sugar with butter. Add orange zest, vanilla and orange liqueur to beaten eggs. Mix well and stir into creamed mixture.
3) In a separate large bowl, whisk flour, baking powder, baking soda and salt to mix. Add oats, raisins, carrots and nuts. Add to butter and sugar mixture. Work with a wooden spoon to mix. The dough will be very stiff.
4) Using a tablespoon measure, drop dough onto prepared cookie sheets, spacing about 2-inches apart. Flatten top of cookies with a fork or damp fingers. Bake for 25 to 30 minutes. Remove from oven. Let sit in pans for 5 minutes. Transfer to a rack to finish cooling. Yield: 36 cookies.

You might also enjoy these recipes:
Lemon Tea Cookies - One Perfect Bite
Chinese-Style Almond Cookies - One Perfect Bite
Bittersweet Chocolate Snowballs - One Perfect Bite

Wednesday, February 3, 2010

Misfortune Cookies


From the kitchen of One Perfect Bite...“Ah, but a man's reach should exceed his grasp, or what's a heaven for?” I've been having an interior dialogue with Robert Browning today. You see, he wrote those words to comfort me. He knew that hubris would one day be my undoing. Make no mistake about it, I've been undone and it's time to "man" up. The cookie you see is the sole survivor of a kitchen experiment gone awry. This one hurts. These hands have spun sugar, boned duck and fashioned puff pastry so flaky and crisp that grown men have been known to weep and plead for mercy. These hands were sure they could make quick work of this task. After all, how hard could it be? Some flour, a little sugar, an egg or two, and, voila, home made fortune cookies. What could possibly be simpler? I had written special fortunes and color coded them so I'd know who should receive each of the cookies I'd baked. They were to be a special treat for Chinese New Year. I followed the recipe to a tee, but sensed from the get-go that I was in trouble. The thin batter rippled as as I smoothed the cookies on parchment paper. First note to self! Bake the cookies on silpat pads rather than parchment paper. Second note to self! Work with one cookie at a time, unless your hands suddenly develop a speed that rivals that of a hummingbird's wings. By the time I finished with one cookie, the others were unmalleable. Third note to self! Call Lok Yuan and order a hundred fortune cookies. After all, it's the thought that counts. I don't doubt this recipe is doable. The cookies are delicious and, if you're dexterous, a snap to make. I'm not dexterous. If you have time and are nimble, they're well worth a try. Here's the recipe.

Fortune Cookies...from the kitchen of One Perfect Bite, inspired by Sara Perry and Nancy McDermott

Ingredients:
1/2 cup all-purpose flour
1 tablespoon cornstarch
1/4 cup sugar
1/8 teaspoon salt
1/4 cup vegetable oil
2 egg whites at room temperature
1 teaspoon orange zest
1 tablespoon orange juice
1 teaspoon vanilla extract

Directions:
1) Preheat oven to 325 degrees F. Line a baking sheet with a reusable nonstick liner or parchment paper. Place fortune strips in a small bowl. Set out a measuring cup and a 12-cup muffin tin to help form cookies while they are hot.
2) Whisk flour, cornstarch, sugar and salt together in a medium bowl until well-blended. Add oil, egg whites, orange zest and juice and vanilla extract. Beat with an electric mixer until smooth.
3) Working with just two cookies at a time and leaving 3 inches between them, drop batter from a level tablespoon measure onto prepared baking sheet. Using back of a spoon or an offset spatula, spread each portion of batter into a 4-inch diameter circle. Bake until edges start to brown, about 8 to 10 minutes.
4) Using a thin, flexible spatula, lift each cookie off baking pan. Place a fortune strip in center of each cookie, then quickly fold in half. Pick up and drape over edge of measuring cup, gently pressing edges down to form standard fortune cookie shape. Place shaped cookies into muffin cups to complete cooling. Continue baking and shaping until all batter has been used. Store airtight. Yield: 12 cookies.

Friday, January 15, 2010

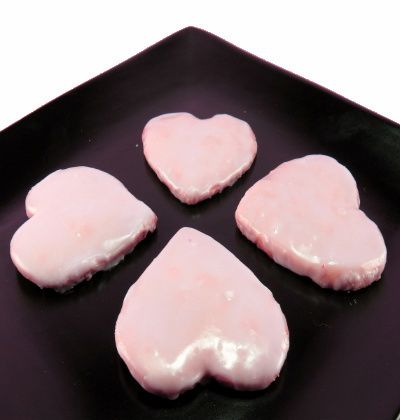
Sweetheart Shortbread - Pink Saturday


From the kitchen of One Perfect Bite...
I adore shortbread, thick or thin, and this is my favorite recipe for this buttery treat. I've dipped the cookies into a pink frosting for Pink Saturday. Truth be told, I also use a variety of other frostings or toppings for this cookie. This one seemed appropriate with Valentine's Day not too far off. This versatile classic defines simplicity and is very easy to make. It can take any shape you choose to give it. You're going to love this one, I promise. Here's the recipe.

Sweetheart Shortbread...from the kitchen of One Perfect Bite

Ingredients:
Cookie Base:
1 cup butter, room temperature
3/4 cup confectioners' sugar
1 tablespoon vanilla extract
2 cups all-purpose flour
1 teaspoon baking powder
Icing:
1 cup confectioners' sugar, sifted
2 tablespoons whole milk
Red food coloring

Directions:
1) To make cookie base: Combine butter and confectioners' sugar in bowl of an electric stand mixer. Beat with paddle attachment on medium speed until fluffy. Add vanilla extract and beat until combined. Combine flour and baking powder in a separate bowl. With mixer on low speed, slowly add flour to butter mixture. Beat only until combined. Over beating will make cookies tough. From dough in a ball. Cover in plastic wrap and chill for 30 minutes. Meanwhile, preheat oven to 350 degrees F. Line 2 baking sheets with parchment paper. Set aside. When dough is chilled, transfer to a lightly floured surface and roll dough to a thickness of 1/4-inch. Cut to desired shape with cookie cutter of your choice. Transfer to prepared cookie sheets, placing cookies 1/2-inch apart. Scraps can be rerolled.
Bake for 10 to 12 minutes. Cool on baking sheet for 10 minutes before transferring to cooling racks.
2) To make frosting: Combine confectioners' sugar, milk and a drop of red food coloring in a small bowl. When cookies are cool, dip them face down into frosting and transfer, frosting side up, to a rack that will allow excess to drip off. Allow frosting to set before transferring to air tight containers. Yield: 24 cookies.

This post is being linked to:
Pink Saturday, sponsored by Beverly at How Sweet the Sound

Thursday, December 17, 2009

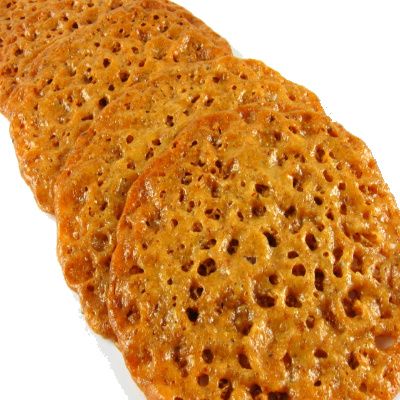
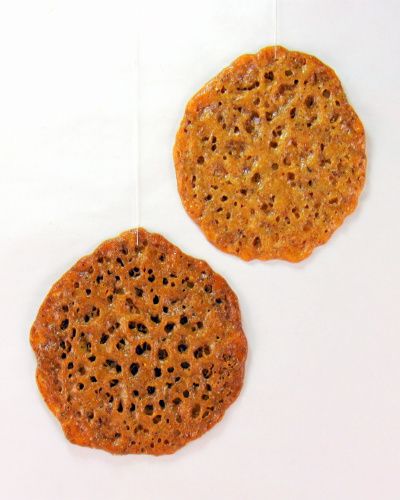
Florentine Lace Cookies


The appearance of these cookies on my holiday tray began as a fondness for the person who introduced me to them. I'd never had them in Chicago, and when we moved east I was still of an age where I thought I knew everything. Yvonne, whom we met through an old-fashioned letter of introduction, was determined to show me how mistaken that notion was. She was French and charming and had an accent that would make the angels sing. She was also a natural born teacher. Her original mission was to teach me needle work, but when that didn't work as she planned, she took me into her kitchen. That visit led to a Christmas that would include our first Paris Brest, a Bouche de Noel and these lovely lacy Florentines. Contrary to popular belief, these cookies are not Italian. They've been traced to the kitchens of Louis XIV where they were made for visiting Medici princes who took them back with them when they returned to Florence. Of all the cookies I've prepared for the holidays, these are my favorites. I love the way they look and smell and taste. While we eat ours out of hand, it is not uncommon to see them drizzled with chocolate. I love chocolate but I don't think it adds anything to these cookies. If you try the recipe, or are a fan of Florentines, I'd love to know how you feel about using chocolate to finish them. If you've never made them, there is one truc you should be aware of. Even though you bake the cookies one tray at a time, the dough must be dropped on cookie sheets while it is still warm. Once it cools it will crumble and become unworkable. So, while you'll bake 6 cookies per sheet, you'll form all sheets as soon as the dough is cool enough to handle. I think you're going to love them. I have a cookie monster, now in his 7th decade, who lives in my house and shares my table. I have to hide these from him because, left to his own devices, he will eat them all in a day or two. These are really good, so instead of talking, let's preheat the oven and get to it.

Florentines...from the kitchen of One Perfect Bite

Ingredients:
1/2 cup ground almonds (about 2-oz.)
5 tablespoons unsalted butter
1/4 cup firmly-packed light brown sugar
2 tablespoons granulated sugar
2 tablespoons light corn syrup
1/3 cup all-purpose flour
Pinch salt
1 teaspoon pure vanilla extract

Directions:

1) Preheat oven to 350 degrees F. Position two oven racks in the middle and upper third of oven. Line two cookie sheets with parchment paper.
2) In a food processor, grind almonds finely; measure out 1/2 cup and set aside.
It is also possible to buy ground almonds for use in this recipe.
3) In a medium saucepan over low heat, heat the butter, brown sugar, granulated sugar, and corn syrup until the butter melts and the sugar dissolves, stirring often. Increase the heat to medium high and, stirring constantly, bring mixture JUST to a boil. Immediately remove pan from the heat and stir in flour and salt until incorporated. Stir in ground almonds and vanilla extract.
4) Drop batter using a teaspoon, 3-inches apart, on prepared cookie sheets (about 1/2 dozen cookies per cookie sheet). Prepare all your pans of cookies at this time even though you are only going to bake 1 or 2 sheets at a time.
5) Bake cookies until evenly light brown, approximately 8 to 10 minutes until cookies spread, become thin, and take on a deep golden color. If you are using 2 cookie sheets switch top to bottom and back to front at 5 minute mark to promote even baking. Cookies will begin to spread 6 minutes into baking time.
6) Line wire cooling racks with plastic wrap. When cookies are done baking, remove cookies from oven and, as soon as they're firm enough to lift off baking sheet (which will take just a few minutes), use a wide spatula to transfer them to prepared cooling racks to cool completely. Allowing cookies to cool slightly on cookie sheets will also cause them to flatten out more. NOTE: If cookies become too cold and hard to remove from baking sheet without shattering them, replace pan in the oven to soften the cookies again. Bake remaining cookies; batter will have firmed up a bit, but that is fine. Store flat cookies between sheets of parchment paper in a tin or plastic container with a tight-fitting lid. Yield: 25 to 30 cookies.

This recipe is being linked to:
Designs By Gollum - Foodie Friday

Tuesday, December 15, 2009

Rosettes - Outdoor Wednesday


Rosettes - today's recipe - and a tree decorated for the holiday in a Swedish amusement park.


From the kitchen of One Perfect bite...Rosettes are deep fried, ornate pastries that are formed with a special iron and served during the Christmas holidays throughout Scandinavia and Eastern Europe. They are also a standard feature of the table at Chez Mary. For me, and for many who were children during WWII, they are also "a remembrance of things past". Once the use of the rosette iron is mastered, you'll find them simple to make, wonderful to eat and kind to the family budget. I've just finished making 48 rosettes for less than three dollars. I mention cost not because I think it's of special concern to you, but their simplicity and affordability are what made these cookies known to me. I've spoken in the past, perhaps too much, of war kitchens. Unfortunately, in this season of miracles, I've been discovered by a few people who would like to rewrite the history of kitchens in the United States. We have to live with stupidity, but ignorance drives me crazy because it is avoidable. Like it or not, there has been a huge change our country's eating habits over the past 50 years. Today's cookies are a case in point. When the government has rationed your use of butter, sugar and eggs, you can throw your hands in the air, shake your head and walk away, or choose to emulate those wonderful women of my childhood and make do with what is on hand. The Italian kitchen of Mrs. S, the German kitchen of Hannie and the Swedish kitchen of Mrs. P all made rosettes for Christmas. Their rosettes were different from each other, but they all managed to make a wonderful pastry for pennies. Each made a cookie that reflected their cultural traditions. One used beer, one used anise and one used citrus zest. Using the simplest of batters, they made the culinary traditions of their families shine. I hope you'll give these a try. I've chosen the most basic batter to get you started and I have a few tips to share with you regarding the iron used to form the rosettes. The iron should sit in hot oil for 10 minutes before it is dipped into batter. The batter into which the hot iron is dipped should come no further than 3/4 of the way up the mold. Any higher and you'll not be able to release the cookie at the proper time. I've found that I get the crispest rosettes if I let the batter sit overnight before being used. I also like to sugar the rosettes while they are still warm. While many people use cinnamon sugar, I prefer to use confectioners' sugar because most of my holiday cookies are highly spiced and the rosettes are a nice change. Vanilla and lemon sugar would also be lovely here. That's up to you. Here's the base recipe for one of the nicest Christmas cookies you'll ever have. Many will tell you these keep for a week. Don't believe them. These are best eaten the day they are made. The cookies can be stored in an airtight container for several days, but you'll notice the deterioration of the pastries with each passing day. Try to keep the oil in which the rosettes are fried at a constant temperature. If it is hot enough when the dough goes into the oil you'll find the cookies do not absorb the oil. I know you'll love this one.

Rosettes...from the kitchen of One Perfect Bite

Ingredients:
1 cup all-purpose flour, sifted before measuring
1/2 cup evaporated milk
1/2 cup water or flat beer
1 teaspoon sugar
1/4 teaspoon salt
1 large egg, beaten
Cinnamon sugar or confectioners' sugar for dusting

Directions:
1) Combine milk, water (or beer), sugar, salt and egg in a medium bowl. Whisk to combine. Slowly stir in flour; beat with an electric beater at medium speed until smooth.
2) Heat 2-inches of vegetable oil to 365 degrees F. Heat iron in hot oil for 5 to 10 minutes. Shake off excess. Dip iron into batter until it covers 3/4 of mold's height. Go no higher or batter will not release from mold. As soon as Rosette begins to brown, lift mold and let Rosette drop gently into oil. Turn it over and let reverse side cook for a few extra second.
3) Carefully remove Rosette and drain on paper toweling. Sprinkle with cinnamon sugar or confectioners' sugar. Repeat until batter is used. Yield: 48 Rosettes.

Cook's Note: Rosettes can be frozen. Re-crisp in 300 degree F. oven.

This is being linked to:
Outdoor Wednesday - A Southern Daydreamer